Dreadlocks Sectioning Guide
In this article we will discuss sections, probably the most important step of dread making.
We’ll look at five ways to section your hair. If you’re curious about different hairstyles, these patterns can also be used for installing synthetic dreadlocks or braids.
Note: for pre-looped braids, instead of sectioning your hair, it’s recommended to make cornrows first, and then install the braids using a crochet needle. To know more about synthetic braid hair, see our dedicated guide.

Pre-looped box braids available on DreadLab.
Materials and preparation to divide your hair into sections
You’ll need:
- a dreadlocks comb,
- mini elastic bands,
- locking dust or dry dreadlocks shampoo (optional)
Ideally you’d find a friend who can help you with the back of your head, otherwise you’ll need one mirror in front of you and one behind you, at an angle. Try to position them so that you have a good view of your whole head. As you can imagine, working by yourself can be tricky so our advice is to have patience: good results require time.
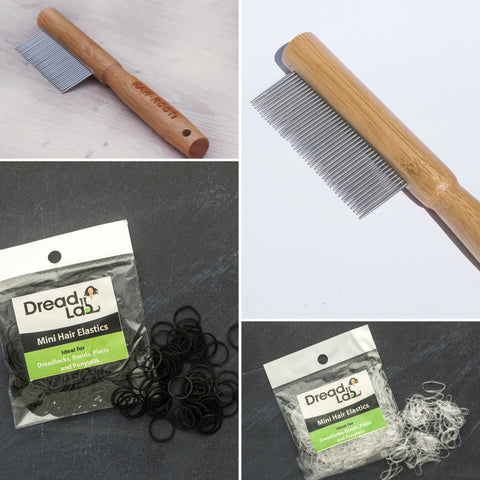
Some of the things you’ll need, available on DreadLab.
It’s important to prepare your hair correctly. Of course wash it and dry it well, but don’t use any conditioner prior to dreading. A simple trick to dry your hair a little bit, so they’re easier to knot together, is to sprinkle some locking dust on your lengths. We offer different dry shampoos which are ideal as locking dusts, like the ones from Dollylocks and Raw Roots.
When you’re ready, start separating your hair following the pattern of your choice. I collected here the most common and practical patterns, used by dread lovers and professionals. For all these patterns, it’s advisable to section your whole head first, then start dreading. The only exception is the “pick and go” method which we’ll see at the end.

This is the easiest one. You’ll need to run your comb across your head creating horizontal and vertical lines of clear scalp.
Step 1: hold your hair on the top of your head with a big hair clipper, then start separating them by drawing horizontal lines, from one ear to the other, with your comb. Start at the bottom of your head from the back. Leave roughly one inch, or slightly more, between lines. Tie your hair with the mini elastic bands as you divide them. When you reach the crown line, create a few lines in the front, following the shape of your forehead. See image for reference.

.
Continue to draw lines from side to side, until you cover your whole head. Then proceed with intersecting lines, to create little squares.
The grid is easier done than said. The downside of this super easy pattern is that it can look funny: vertical lines of skin will be visible when you’re wearing your dreads down. You may like this effect, but if you don’t, an easy variation is the brick lay pattern.
Pattern 2: BRICK LAY

Think of a wall of bricks: the horizontal lines are continuous, but the vertical lines are alternate. With this pattern, each dread or braid will fall over the space between the two dreads/braids under it. Just like the grid, it’s better to start from the bottom of your head and make the side-to-side lines first, then divide them vertically or front-to-back. Don’t worry about making it perfect but try to make your sections as equal as possible.
Pattern 3: TRIANGLES

The triangle pattern is more common for braids. To create it, proceed with the horizontal lines. Then draw a zigzag line across each row with your comb. Try to make the sharper points facing each other between rows. This pattern will look quirky and fashionable, however the sharp points will potentially hold too much weight or pressure when your hair is down or tied. It’s perfect for something temporary like synthetic dreadlocks or braids, but less ideal for real dreadlocks.

Photo by Gift Habeshawon Unsplash
Pattern 4: FAN or SCALES

This pattern has no straight lines, so it will look less “rigid” and more natural. The downside is that, if you’re working alone with two mirrors, it’s quite difficult to create a good fan pattern. However, if done properly, it allows perfect covering of the vertical lines, and your dreads will all have similar thickness.
To create it, draw a row of high semicircles at the back of your head. For the row above, you’d start and finish each semicircle at the highest points of the semicircles below. When you reach the crown line, create a row of semicircles along your forehead. Then continue from the back. When there is no space anymore for semicircles, on the top of your head, try to divide the remaining hair equally.
Option 5: PICK AND GO
This is not really a pattern, more like a way of sectioning. You won’t need to section your whole head first: you can pick a bunch of hair, dividing them well from the rest, and immediately start dreading. The ‘pick and go’ offers the most organic look, because each section will have its own shape and size, similar to freeform locs.
After sectioning, you can proceed with the techniques we saw in the last article, to create “instant” dreadlocks. Check it out if you didn’t yet!
Is this guide helpful to you? If so, share it with your friends!
Why not also subscribe to our newsletter for exclusive deals and updates on the latest dreadlocks products and helpful guides! Find the form at the bottom of this page.
About the author

